Navigation for this costume:
Introduction – Materials – Smock – Farthingale – Petticoat – Bodice – Skirtings – Rolled Sleeves – Overskirt – Forepart – Ruffs – Partlet and Sleeves – Jewelry making: Headdress; Necklace; Pelican Jewel; Sleeveband; Girdle; Wristbands; Fan – Finished gown – Funny Comments – Miss Starkie – Quiz
I started constructing the bodice by using Margo’s pattern, which of course was simple (this is not the first „Margo“ I make, and will hopefully not be the last, but it was easy from first try on – I can just praise and repeat on and on that these patterns are really, really worth the money!).
While Janet Arnold says in „Queen Elizabeth’s Wardrobe unlock’d“ that this is a front closing bodice, for which I normally wouldn’t need any more (back) lacings, I decided to actually add side back lacings because I tend to loose and gain weight – by having the side back lacings I can adjust this; and the front closure helps me to open and close the bodice faster.
Unfortunately, there are no pictures of the actual construction process, because that was a time when the memory chip of my digital camera decided to be „write protected“, and until I had figured out how to make it accept pictures again I already had finished the basic construction of the bodice as well as some decoration.
The bodice consists of three layers: The outer – velvet – layer, and two inner linen layers. One of those linen layers serves as flat lining of the outer velvet layer.
Between the two linen layers, I have sandwiched the boning of the bodice (not to be confused with the boning of the stays).
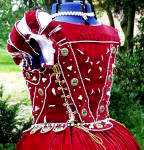
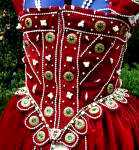
For the ‚guards‘ decoration, I cut some strips of velvet and hand-basted those to the outer layer of the bodice in a likely way as they are decorated on the original gown. I securely attached them by actually sewing the smaller pearl strings with a ladder-machine-stitch and a pearl foot to the bodice and the bands. The pearl strings have another advantage: They are, by nature, a little stiff and therefore, if sewn to the bodice, stiffen this also.
I then marked the position of the slashes in the portrait, and added some slashes by myself after a similar pattern on the backside of the gown. I secured the to-be-slashes with liquid rubber from the backside of the fabric to prevent fraying, then, after drying, cut them and carefully slipstitched puffed strips of habotai silk behind them, which form the poufs that emerge from the slashes.
The bodice is also decorated with something that looks like (and will therefore be called) slashed piping here. This was sewn to the upper- and sleeve edges of the bodice.
What you can also see in this picture is that with all the disks, Quadruples etc. decorations, I sometimes got confused and accidentally put something in the wrong place – usually, it has to be: two parallel pearls with caps – a disk – two pearls/caps – a Quadruple – two pearls/caps – a disk… but on the right bottom side, you see two Quadruples…. *sigh*….
Slashes in the middle of the backside
The bodice in various stages of finishing:
And finally completely finished:
Lacings
For the lacings, I have indeed dared to use golden metal grommets instead of hand stitching the eyelets, as it would have been period. Because, no matter what others might say, I *still* think that correctly applied metal grommets are better for lacings than hand stitched ones.

This picture still shows a gap under the lacings because the modesty panels under the lacings are still missing. The sleeves are not yet finished in this picture either, but it’s the best picture of the lacings I have.
The lacing I used here is, actually, ladder lacing; though I know quite well that it looks like spiral lacing at first sight.
If I should at some point of time have some spare time left, I will overstitch those metal grommets with golden thread, giving them the appearance of hand stitched eyelets.
The bodice, of course, also needed skirtings, so this will be the next chapter.
Navigation for this costume:
Introduction – Materials – Smock – Farthingale – Petticoat – Bodice – Skirtings – Rolled Sleeves – Overskirt – Forepart – Ruffs – Partlet and Sleeves – Jewelry making: Headdress; Necklace; Pelican Jewel; Sleeveband; Girdle; Wristbands; Fan – Finished gown – Funny Comments – Miss Starkie – Quiz
