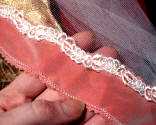
Peach gown from ‚Sleepy Hollow‘
(In progress, that’s why the below shown navigation doesn’t completely work yet)
One (though not the only) dress that I found interesting (though not most) since seeing the movie was this one here:




Various pictures of the peach dress from Sleepy Hollow as worn by Katrina van Tassel / Christina Ricci
Navigation for this site:
Observations on the original gown
The fabric
The patterns
Dress diary; separated in:
Material collecting
Making
Thoughts & observations on the original dress
I have also written down some general thoughts about the costumes from that particular movie down here. Please read them if you’re interested. By the way, in case you haven’t seen it yet – I’ve also made the embroidered cloak from the movie for a friend, you can find it here.
The original dress is probably made from some kind of pale golden (duchesse?) satin, painted with peach vines and roses. The dress is decorated with coral / peach trims and the bottom hem is embroidered in peach.
Furthermore, she is wearing a white neckerchief with scalloped, peach/coral and embroidered white edges with the dress.
The dress, which is cut like a Robe à la Anglaise, is basically very historical (at least if one would assume that the movie would play, let’s say, 30 years earlier than it’s supposed to – read this page for further details!) – with one exception: It has a lacing down the backside. The dress can barely be seen from the backside in the movie; however, I managed to take some screenshots where you can see (or at least guess!) the spiral lacing at the center back.
That spiral lacing (or rather ANY lacing!) down the center back is NOT historically correct on an Anglaise. They were front laced, front buttoned, front hooked, front pinned – and I mean down the center front as well as the side front(s) in case of a stomacher kind of closure – but they were never laced down the back as far as I know (if you have evidence for any back lacing Anglaises – please let me know and I will happily correct my writing here!).
The one thing I find most beautiful is the neckerchief that is worn with the gown. It wraps around the shoulders and then between the breasts around the waist, just to finally tie at the bottom back of the bodice (there must be something there to what the ends of the neckerchief are tied!). I would bet that without this neckerchief the gown will look rather boring. It is, by the way, not just ’some‘ kind of neckerchief – the scalloped edge of it are also on the sleeve flounces of the dress, so that it’s clear that both neckerchief and dress definitely belong together.
I have to say that peach / gold is not *exactly* my color combination. My skin is *very* light and has a pale rose / blue hue, so peach never was my color because it makes me look, well… dead.
However, when seeing Christina Ricci wear this dress, who has about the same skin color as I have, I found that the color was actually quite becoming.
Still I didn’t plan to make this dress. It was not that I would have ’needed‘ it, nor did I ever come across a fabric that would work for this gown (though I have to admit that I never really searched, either).
Accidentally, I stumbled over a fabric which I personally found absolutely perfect for the gown.
Golden beige, slightly metallic, with woven golden and pink-peach flowers in it. Here are some pictures – the fabric is not only beautiful but also *very* difficult to photograph:
The pictures show the golden / pink brocade and the taffeta with which I’m intending to decorate and line the dress.
As you can see, the brocade looks golden from the front but if you look at it from an angle the flowers turn pink-peach (best to be seen in the second and last picture).
The taffeta is shot, woven with dark coral and cream threads. This makes it match the brocade even more.
This is how my fabrics look compared directly to the original fabrics:


Left: Original fabrics; right: my fabrics
Doesn’t look bad, right? 😉
My fabrics are a little more pink than peach, but that is something I rather welcome.
And I found just enough of the brocade that I could make one dress from it (5 yards). Plus, it was affordable. So I bought it and started to think a bit about the dress, which you can read above.
Some notes before starting the diary on…:
Searching for any evidence for a back laced Anglaise I have flipped through countless books, read a gazillion websites and looked at hundreds of paintings – to no avail.
I was biting my nails when thinking about turning the dress into something really historic by adding a front closure, but then again that would destroy the look.
I also thought of adding an ‚inverted‘ stomacher, like the black / white gown from the same movie has:
and which actually *is* historic – see this gown from the Kyoto Costume Institute which has a likely closure:
But then again I thought that this would somehow destroy the look of the original costume, if this ‚diagonal‘ closure would show anywhere below the neckerchief.
Then I was thinking realistic:
My fabric is mostly artificial, I will probably never wear the gown for any competition, and what I’m trying to make here is the reproduction of a movie costume, not an original historical dress.
I then stopped biting my nails and decided that I could also live with a back laced Anglaise.
So I took a pattern from Norah Waugh’s ‚Cut of women’s clothes‘ – Diagram XXII – Robe à L’Anglaise 1775-80, to be exact, omitted the sewn-on overskirt and enlarged just the bodice pattern to my size. I chose that particular pattern because it has that nice deep neckline.
I also changed the shape of the front a bit to be able to cut the front in one piece and to have that nice point at the bottom middle. I also had to shorten the back pieces a bit.
For the skirt I decided just to drape it on the stand without any pattern. The skirt is very simple with just few, regular inverted pleats along the waistline, which can clearly be seen in the following screenshots:
Knowing that those skirts were (historically) always constructed from straight fabric panels which were then pleated along the waist and always had a straight seam at the bottom, I knew that it shouldn’t be too difficult to drape the skirt without a pattern but just the knowledge where the pleats would have to be.
And now – here’s the dress diary.
| Material collecting | |
| 30th of March 2006 | Received my brocade fabric. Started writing this page but decided to publish it only when the dress is finished. |
| 1st of April 2006 | Found the matching taffeta for the decorations and some soft netting for the neckerchief. No trace of a matching organza for the flounces on the skirt yet. Also started looking around for a matching trim for the neckerchief / sleeve – the ‚rose garlands‘: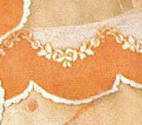
I’m sure that I have seen this (as yardage of lace trim) somewhere (in a shop), but can’t remember where. Will keep searching. |
| 5th of April 2006 | As I was bored (note: not that I had nothing else to do. But if you walk past such a beautiful fabric several times a day and each time it screams „Use me! Use me!“ then, at some point of time, you can’t resist but actually take and use it!) I thought I’d take a few minutes to drape the skirt on the stand. The ‚few minutes‘ turned into 1 1/2 hours and then the draped skirt, consisting of two fabric panels of 60“ / 152cm breadth each, looked like this (shown here with an Elizabethan bumroll, which is a tad too large for this skirt):
Taking into consideration that it’s just pinned and has no lining or hem stiffening nor any petticoat below yet, I think it looks absolutely perfect. |
| 8th of April 2006 | Finally got my printer cartridge refilled so that I could print and glue the bodice pattern, so I can make a mockup which will later serve as a lining! Took the chance and printed out a pattern for a period jacket as well, which I can make in case I should have enough fabric left. Still no organza for the decorations in sight, *sigh*… |
| 10th of April 2006 | I *so* knew it! Didn’t I mention above that I thought I had seen something likely to that lace trim somewhere? Well, guess what? I found it. When I was packing away some of my trims today, I found it *in my trims collection*! (That comes from being a fabrics- and trims addict – if you’ve been just that for several years, a point of time will come when you have no idea what you have ever bought…). 
It’s not just white but white with pink, yes – but I think it’s nice and works great for that costume. And this is what the bodice – sewn, but shoulder straps and sleeves a well as lacing holes still missing – looks like when put on a dress form that’s not adjusted to the right size (too big, that’s why there’s a giant gap on the backside, and without stays, that’s why it looks a little… strange) and draped with the neckerchief:
I’ve put that bodice on for a moment – if the neckerchief is pinned to the bodice, that’s quite simple even without any lacings – over my stays and I must say that ‚*this* is one of the sexiest gowns I have ever looked at in a mirror. At least it makes me feel sexy. I need to find someone who can photograph me from somewhere *above*, otherwise you won’t know what I mean… 😉 Here are some pictures of the still pinned, unfinished skirt together with the bodice / neckerchief-combination, as shown above (without any bumroll or anything likely which makes the skirt look a bit… well, too narrow around the hips 😉 : I’ll admit without shame that I’m utterly in love with that gown by now. When I started on it I found it nice – but by now, I’m in love… |
| ~notes~ | Before I start showing you my sleeve- and skirt flounces, some observations on the original gown…:
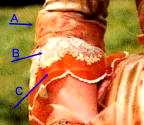
First, the sleeve flounces: ‚A‘ points at some kind of peach banding that seems to be wound around the arm. It seems to be made of some kind of jacquard, or perhaps a burnout satin. Now the skirt flounce: ‚A‘ points at the ‚usual‘ painted or printed fabric of which most of the skirt and the bodice are made. Good.. having that said, now on to my flounces compared to the original ones as seen above…: Sleeve flounces Here’s mine. I’ve used my taffeta with an overlay of pink organza for ‚A‘, a nice and soft wide lace for ‚B‘ and my pink taffeta and the scalloped lace edging for ‚C‘. Skirt flounce I’ve used the ’normal‘ dress brocade for A & E, omitting the embroideries at the bottom. For B to D, I’ve used a pink organza; and for the underlying C my taffeta. Note that in my picture you can still see the white gathering threads running on top and bottom of the taffeta banding. |
| 15th of April 2006 | My dress is finished!Here are some pictures of the gown on my dressmaking model. I’ve added two lacing panels to the center back; this enables me to much quicker change the size of the bodice in case I should gain / lose weight. The last two pictures show my and the original gown for comparing purposes.
I’ll need to pin the neckerchief along the neckline of the bodice because it won’t stay there by itself – not even if it’s just on the dress form! My best guess is that on the original gown the neckerchief was also at least partially attached to the bodice. |
| 16th of April 2006 | Here are some pictures of me wearing the gown. As I had to take them myself (that means – running to the camera – setting it to take a picture – running back to have a picture taken – picture is taken – running back to the camera to see how the picture turned out and to set it to take another picture…) the pics aren’t too great and none of them shows the gown in full length. Nevertheless, I decided that I should show them here because I probably won’t find anyone photographing me wearing this dress for a long time, and pictures of a dress on a human being instead of a dress form are *always* better, even if they are unsharp and / or not full length, as mine are. The bodice is *not* completely laced close on the backside because I had no one to help me with that task, and doing it alone was incredibly difficult with those tight, forwards pointing rococo sleeves so I couldn’t do it properly. For the same reason the neckerchief is not pinned to the bodice neckline, which is why it drapes the wrong way. I’m seriously thinking about sewing it to the bodice permanently, though that will give me the problem that the neckline will be closed at the back because the neckerchief is not split there. Here they are: 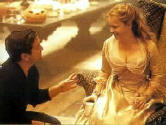
The last three pictures of myself partially show the above mentioned ’sexiest gown on earth‘ effect (though it’s still a lot more obvious in person 😉 ) – the very last picture shows that effect on the original gown in a production picture. |


