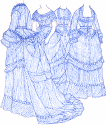
As I have already mentioned on the index page, I wanted a mix between the various stage versions of this costume. To be exact, I wanted those things…:
- The waterfall drape of the US gown. My lining color would be dark blue velvet; I’m contemplating to use ‚black-blue‘ – black velvet with a blue shimmer.
- For the apron (the drapery at the front) I want the ‚chevroned‘ version; here’s one example from Germany:
- For the sleeves, I find the Brazilian version very attractive; especially the small embroidered velvet ‚cap‘ at its end. I also like the fact that the stripes are running downwards on the sleeves and not on the bias, as with some other versions.
- For the hem decoration of skirt, apron and pannier I like what was done for the American version – that means skirt and pannier are bordered with a dark velvet trim and two white trims, and the apron additionally has a small pleated frill of the dress fabric. The white trims are something I don’t like, but I’ll get back to that later.
- for all trims that are white on most versions, I prefer what was obviously done on one of the London versions (at least the bodice) – replace them with silver and / or golden trims.
- At least one of the versions also has a trim of some kind of bouillion fringe, which I also like and want to use. I’d want them in a color matching the velvet of the drape, trims and front, meaning they’ll have to be a very dark blue.
- My embroideries on sleeve caps, bodice front and collar would have to be like the ones on one of the German versions – the peacock feathers:
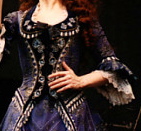
(Just because I have a *big* love for peacock feathers 😉 )
- I’d like to make them in silver and gold, though; as Bullion embroideries. The already mentioned silver and golden trims would match those embroideries. Bullion embroideries, however, are basically no more period for a Victorian outfit (except uniforms), so here I am being in some kind of dilemma and have to think that over again. I like the idea a lot, though 😉
- Whatever I’ll decide for (or against) – the base for whatever embroideries would have to be the same blue velvet that serves as a lining for the waterfall drapes. Perhaps I’ll use black velvet with a blue shimmer (aka ‚Arwen Bloodred velvet‘)… for which I also have quite a liking 🙂
You may wonder what fabric I’m intending to use. I proudly present: The fabric!

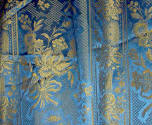
(left picture shows the fabric draped over a door; this perhaps makes it easier for you to estimate the size of its pattern, which is shown close-up in the right picture)
This fabric almost looks like the fabric that was used on one of the London versions:
and – read it and be amazed – I’ve bought several yards of that fabric (16.5 yards // 15 meters) several years ago (5 or 6, I think) – and so far found no other use for it but two pairs of stays. So there’s plenty left for the gown I want to make 🙂 My digital layouts, which I always make when working with patterned fabrics, shows me that I can get away with just using *seven* yards of the fabric, so there’s even enough left for eventually making a second gown.
I have also ‚franken-patterned‘ from several patterns from ‚Patterns of Fashion‘ a pattern that might work for the dress, and with Michaela’s wonderful tutorial for making waterfall drapes (even if she denies that this is a tutorial, I’ll just take it as one because it taught me how to make waterfall drapes! 😉 ) I have made those, too (count the number of the word ‚pattern‘ in this last sentence and tell me how to reduce it!).
I have already placed the pattern pieces on a digital layout of my fabric (I have briefly described how that is done on this page, where I have made the same thing for a different dress) and found that I could actually two blue wishing gowns from my fabric, if I wanted to (though one will be sufficient for the start, I guess 😉 ).
Here’s the digital layout:
![]()
This represents a 6.6 meters long piece of fabric with all pattern pieces required on it. The two rectangles at the bottom represent the underskirt, which I will sew and pleat from these two rectangles.
You can also see the slight changes I made to various other pattern pieces by simply adding new lines to their outside shape. The waterfall draped is just indicated by such lines on the fabric, and it is directly joined to the center back piece of the bodice.
From top to bottom: Apron, bodice front (without darts in this layout), bodice side back, bodice undersleeve, bodice center back with waterfall drape, bodice oversleeve, pannier, underskirt rectangles.
I ‚just‘ need another four yards of 1.5 meters wide velvet, then I can start on this gown….
And here are the different patterns which I’ve used to franken-pattern the pattern for this gown (again – count the word ‚pattern‘ in the last sentence – and tell me how to reduce that number…):
For the bodice:
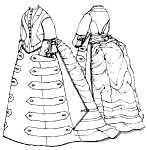
From ‚Patterns of Fashion 2 – 1860-1940‘, the dress on page 30/31
I know I’ll have to change the layout of that pattern a bit, but I think it will work great. I am planning to use the same pattern (not only the bodice – the *full* pattern!) for my Victorian Boarding dress; so I’ll only have to resize and print that once 😉
As I have already written, I’ll attach the waterfall drape directly to the center back middle piece of the bodice – you can see that in the ‚digital fabric layout‘ above – both are cut as one piece.
For the underskirt and apron:
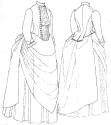
From ‚Patterns of Fashion 2 – 1860-1940‘, the dress on page 38/39
I’ve used that pattern for my ‚Mina‘ doll costume, so I know it will work.
The skirt is basically nothing but a pleated strip of fabric, this is why two rectangles of fabric will be sufficient to make it 🙂
For the panniers:
From ‚Patterns of Fashion 2 – 1860-1940‘, the dress on page 28/29
I *know* that this dress doesn’t have panniers. However, as I have already used that pattern when I made my Victorian Day dress, I know that if what serves here as an „apron“ (basically that’s not an apron – it’s a shorter overskirt that is bustled up on the backside) is front split, it hangs just like panniers. I will just have to omit the bustling on the backside, that’s all.


