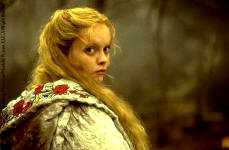
The cloak from Sleepy Hollow is a garment which is constructed quite simply, given that you do some historical research, know a little about how fabrics drape and don’t mind handling massive amounts of fabrics.
The embroidery on the original cloak is very beautiful but probably machine made, and if you would own an embroidery machine, this would also not be too difficult to make. In fact, I’ve once made it almost true to the movie with my embroidery machine (though in silk velvet with some different embroidery colors on request of the customer); some pictures:
However, if you don’t have an embroidery machine, not enough time to machine- or hand embroider the flowers (machine embroidery of those roses well takes over ten hours, given that the correct patterns are already programmed!) or are on a budget then you could also use iron on embroidered rose appliqués, which are available in some trim shops and, of course, on Ebay. I used such iron-on appliqués for this particular cloak, as my friend, for whom I made it, was on a budget.
The original cloak was made of some kind of quite short-piled fur.
I used some heavy cream colored cotton velvet for this cloak which I tried to dye silver grey; but as it turned out my dye mixture seems to have gone wrong in some way – it’s now a blue-ish grey, shimmering light blue in some areas. The interesting effect is that it looks grey in artificial light but powder blue in daylight.
Let’s take a look at some features of the original cloak first:
The cloak shape
The original cloak *could* easily be mistaken for a half circle cloak (or something that would take up even less fabric) – it doesn’t seem to be very wide when worn.
However, when seeing how it drapes when worn on a horse…
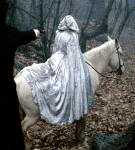
Note that the cloak still drapes in multiple folds all the way down at the front.
…it should be crystal clear that this is most definitely a full circle cloak, meaning that it will take up *massive* amounts of fabric.
Just for the statistics: I’ve used 9 yards of velvet and 11 yards of lining (as this was not as wide as the velvet) for the cloak I made, ending up using 20 yards of fabric for it. The finished cloak weights eight kilograms / 16 pounds.
Here’s my cloak draped over a) just my dressmaking mannequin and b) additionally over a table on the backside, to show the draping:
As I’m lacking a horse to show that effect, here’s a little collage of the last picture with a horse picture (Lord of the Rings‘ King Théoden may forgive me!) side by side with the original picture of Katrina van Tassel / Christina Ricci in Sleepy Hollow:
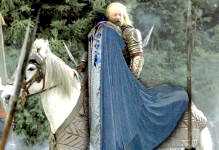

Compare the draping of the front and back in both pictures – yes, the original cloak most definitely was a full circle cloak!
There’s something on the original cloak that also doesn’t seem historical (but the fact that I haven’t found any historical evidence for it doesn’t necessarily mean that it was never done this way…):
Alright, look at the backside. Imagine there’s a straight strip of fabric running down the back, which seems to be the case. Now look at the shoulder area in the right side of the picture. There seems to be a seam running down, and the fabric that goes over the shoulder – which is joined to the aforementioned straight ‚back middle‘ strip – is creasing along that seam line, meaning it is probably gathered.
This effect can also be seen in this:
picture, just not as clearly as above. In this last picture you can also see / guess that the back waistline of the cloak must be tied from the inside in some way to the wearer’s waist as it seems to be pulled towards it without any indication why that is so. I guess there’s a waistband running on the inside of the cloak. which is attached to the waistline of the cloak’s backside. This can’t be permanent and wasn’t always used during the filming, as the cloak fans out without any attachment to the wearer’s waist in this:
picture.
I’ve nevertheless decided to ‚just‘ make a regular full circle cloak, fully lined, with the historical correct gathering on the backside and with the drawstring parallel to the opening of the hood.
The hood shape
There’s something on the hood – to be seen in the pictures the Propstore of London had – that remotely looks like a yoke:

See that ‚gathering line‘ on the hood lining?
This looks almost like some kind of gathered yoke, but on close inspection, you can see that the creasing around the gathering is actually on both sides of the seam.
So what is this strange seam?
Actually, it’s probably supposed to be something very historical: It’s a tunnel for a drawstring, which was used to make the hood fit more snugly around the head. Jean Hunnisett shows some of those ‚drawstring-hoods‘ in her book „Period Costume for Stage and Screen – Patterns for outer garments, Book I“; though they’re also mentioned in other books.
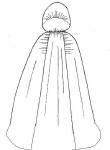
Jean Hunnisett shows some photos, but especially has this beautiful illustration of an extant garment:
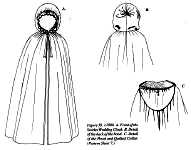
Drawing of a Scarlet Wedding cloak from the Gallery of Costume, Manchester, which is dated to c 1800, drawing made by Jean Hunnisett.
which shows what the drawstring would look like when pulled up. Jean Hunnisett writes:
„(…) The drawstring around the front of the hood could have been pulled up to fit close around the face.“
On the Sleepy Hollow movie cloak, however, this string is just slightly pulled, so that the fabric around the tunnel is slightly creasing – but it’s not exactly pulled tight. It ‚*could* also be some kind of reinforcement seam for the yoke on the outside fur fabric of the cloak:
The outside fur of the original cloak, however, is set to a yoke – this can clearly be seen in this picture:
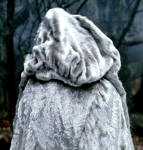
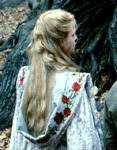
This clearly looks different than the above shown drawstring tunnel which shows on the inside lining, right? Note that the creasing of the fabric only goes „up“, meaning towards the front of the hood, but not „down“, meaning towards the neck. Compare to the inside of the hood in the right picture, which seems to show no crease in the lining at all.
I know no historical reference for something like this and assume that it was done by the costume makers because the fur would have been too thick to set the hood directly into the neck.
As my velvet was not that thick, I decided to go for the gathered hood back, as shown in Jean Hunnisett’s illustration above – as it was done historically.
So just for the records – the correct overall shaping of the original cloak would have been like this:
This would be the backside, showing the gathered fabric along the shoulders as well as the gathered fur attached to the hood yoke.
The embroideries
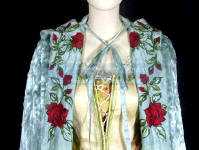


Embroideries on the original cloak
As I have mentioned before, I used ready-made iron-on roses for the cloak. Here are some close-up pictures of them on collar and hood:
The closures
The cloak can be closed in two different ways:
First, with a decorative clasp, to close it tightly around the neck…
…and second, by the means of two strings which are set into the neck seam, just as it was done on the original cloak:

Left: Original cloak; right: my cloak
I just decided to make the strings used to tie the cloak a little thicker to prevent my dear friend Katrin from strangulating herself 😉
Those strings, by the way, are cotton twill tapes which I covered with the embroidered satin fabric – the satin fabric itself wouldn’t have made stable drawstrings, and the cotton twill tape alone would have looked ugly.
And here are some more pictures of the cloak and the matching bag I have made for it (first picture).
And even if this is not my cloak, I couldn’t resist taking two pictures of myself wearing it – Congrats, Katrin, this would also have been my color combination of choice (I already mentioned that to you, didn’t I? 😉 )
This last picture also shows the shimmer of the velvet. See the hood? It seems to have a different color than the rest of the cloak, which, as you can see in the picture right next to it, is definitely not the case. It’s just shimmering grey 😉
Hopefully Katrin will send me some pictures wearing the cloak, especially of the backside of the hood when put up which I couldn’t take myself… 😉
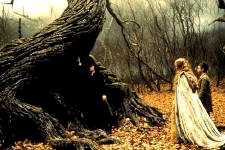

It’s an amazing cloak, I like it.