~Please also have a look at my other Star Wars costume reproductions! ~
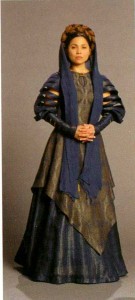
Star Wars Episode 3 – Breha Organa
(aka, „Awazing Sleeves Gown“)
A very important public service announcement first:
By reading this, you must acknowledge, always remember and tell your children and grandchildren that Breha’s gown is universally known as the „Awazing Sleeves Gown“ (capital letters please, those sleeves are huge!).
This is the name that was professionally established on the Rebel Legion costume forums (in this thread, from the bottom of page two on), therefore it must be true and passed on to future generations.
One thing that I will never forget is the reaction I got on the Rebel Legion forums when I casually mentioned Breha Organa in a thread that wasn’t even about her.
Someone immediately wrote, and I quote,
„Oh god Breha’s sleeves. 😆 “
That gave me the idea that the movie Breha will never be remembered for being Leia’s adoptive mom, or for being Bail Organa’s wife. Or queen of Alderaan, for that matter.
No, Breha will eternally be remembered as ’she who had those sleeves‘.
Add the ‚awazing‘ from the actual Breha thread and there you go, „the awazing sleeves gown“! 😀
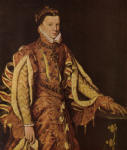
By the way, ‚those sleeves‘ really aren’t a clever, innovative and / or modern / futuristic invention of the Star Wars costuming department.
Actually, I’ve seen sleeves like those (well ALMOST like those!) before – on Isabel de Valois:
Anyway, back to the Awazing Sleeves Gown of Breha.
The Sleeves
(capital letter please, those are LARGE sleeves!)
The sleeves aren’t so scary after all if you’re just looking really close at the exhibit pics on Padawansguide. You can clearly see the seams and shaping right there; and also the direction of the threads in the fabric, indicating how the sleeve must be shaped on flat lying fabric.
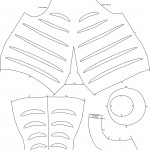
So what I first did was to draft a pattern for the sleeves:
After that I printed the pattern out, pinned the pieces together and attached it to my dress mannequin.
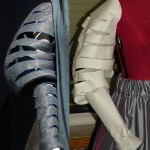
Here’s what it looked like compared to the original gown:
The ‚upper arm‘ part is a tad too long. I solved that by a) bringing the armhole opening further down on the pattern (which makes the sleeve ’shorter‘ from the top side), and then I shortened the inner curve of the upper sleeve a bit. That basically did the trick. Another thing I did was to make the underarm part a bit less than an inch shorter.
The Awazing Sleeves- and underskirt fabric
That part really gave me a headache; and not just me. The original fabric definitely has some wool content; you can clearly see the ‚wool fuzz / hairs‘ standing up from sleeves and skirt. Also, there’s lurex fibers in it – that causes the glittering. It also isn’t blue or peacock; it does have some kind of ’swirls‘ of peacock and purple on blue.
As for the fabric, I really tried. I tried Spoonflower printing (didn’t work because I couldn’t find a glitter that would adhere permanently to the fabric). I tried probably every single online fabrics shop in the world; without success.
But as it usually is – just when you want to give up, you’ll find something. So did I.
What I found was an off-white wool / silk / lurex blend with an almost linen-like appearance (thread thickness wise) and therefore perfect for the skirt and sleeves (of which the fabric definitely does have some wool fiber content – look at all the tiny ‚hairs‘ standing up from the fabric in closeups of the exhibited costume!). The lurex is golden and really pretty in the fabric; not at all ‚lametta‘ looking.
I already did a dye test with a swatch, and it dyes beautifully. When I dye the actual fabric I can dye the scarf / veil silk chiffon at the same time and will have a perfect match.
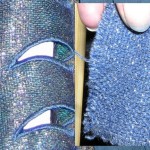
Here’s a photo of my test dyed swatch (just dyed in navy blue, no swirls yet) compared to the original fabric. Note the ‚fuzz / hairs‘ on the left side of the original sleeve and the very same effect on the right side of my test dyed swatch:
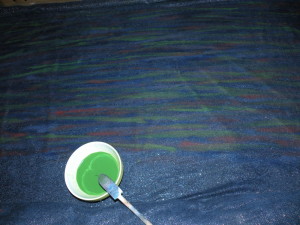
I started by painting the fabric to achieve the ‚Aurora Borealis‘ look of the original fabric. For that, I thoroughly wet the fabric (since that allows the paint to spread easier), and then just started painting it with a foam brush and four different silk paint colors: Blue, red, green and lavender.
I know, it looks weird. But the silk paint IS spreading, and therefore that painted effect becomes WAY less obvious after the paint has spread on the wet fabric and the fabric has eventually dried.
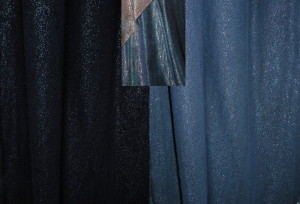
Here are pictures I took after the fabric dried. Left side of picture shows the fabric in daylight (which almost matches the skirt fabric’s color from the first picture on this page, which was taken under studio light); right side of picture shows the fabric being photographed using a flash.
Note that since the exhibit pictures of the fabric which show the Aurora Borealis effect were taken with a flash, I constantly have to check if the color is right by using the same method (flash-photographing it, that is). Fabric that was photographed with a flash will always look quite a bit different from fabric that was taken without a flash; so if you need to match flash-photographed fabric colors, always check the color by, well, flash photographing it.
If you compare my ‚right side‘ flash photo with the smaller picture of the original dress (which I photoshopped right between the two daylight and flash photos of my own fabric), you can see that I’m almost there in achieving that ’streaked‘, aurora borealis effect – may need to add some more green (which turns turquoise on the blue fabric). Click to enlarge:
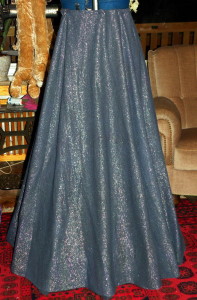
After a *lot* of more painting and after making the pattern for my skirt, it now looks like this – just pinned to the mannequin; no lining in it yet:
I still need to add a waistband (and lining of course).
The overdress
(aka symbol pattern chaos)
For this part of the costume I found a wool / Lurex / PA blend with a much finer weave than the first; therefore will work well for the overdress.
Unfortunately it’s brown; but I already tested that it CAN be bleached to some extend, taking up a light brown / sand color.
Now if I reserve that ‚celtic knot‘ pattern on the bleached fabric with wax and dye it blueish afterwards it should turn out the way I want it to – still need to test that, though; but am not worrying much about it not working.
The dress pattern part however REALLY gave me a headache.
As you may know, if the fabric of a gown has a regular, repeating pattern on it, I’m used to create a seamless, digital version of that fabric and then – by counting the pattern repeat / looking how seams ‚curve‘ on the fabric pattern – draft my pattern just that way.
On THAT overdress however I drafted and drafted for hours, and it wouldn’t fit.
As in: The seams of the side parts just didn’t work length-wise with the front part. They were always too long; but not long enough that I could have thought I MIGHT have forgotten to count a row of symbols.
THEN it finally dawned me:
Those oval symbols on her gown?
On the upper two rows of the center front and the lower two rows of the side parts of her gown, the symbols are smaller than everywhere else on the dress. You can see that if you compare the size of the symbol where the ‚key hole‘ opening at the neckline is to the other symbols *below* that key hole opening.
THAT was the reason why my pattern wouldn’t work – the lower two rows on the side part are running over SMALLER symbols, which, if you take that into consideration when drafting the pattern, makes the side parts a good bit shorter.
Of course I had to „guess“ in quite a few places where the dress is hidden by the veil and / or her arms; but that guessing combined with knowing what dress patterns generally look like works pretty well.
Here’s the pattern I finally came up with:
The missing center back and side parts can be made using the front parts; it’s just that you’ll have to flatten the ‚bust‘ curve of the side parts if you do (to approximately the center of the symbol that the bust curve goes ‚around‘). Also remember that the center back must be split because there HAS to be a zipper.
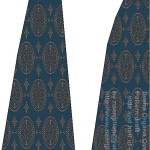
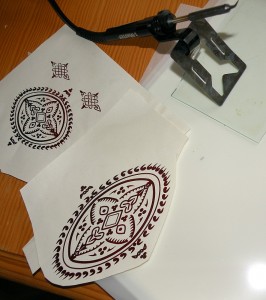
As for the symbols on the dress, my initial plan was to make stamps (using photosensitive stamp material), and then print them to my fabric. However, that didn’t work out because while the finished stencils work very well on paper, they are unable to absorb enough paint to paint fabric properly.
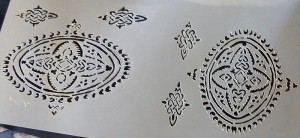
So what I did was to buy a stencil burner (for airbrush stencils), sheets of Mylar (which is used for those stencils), use the template which I had already created for the stamps…
…burn the stencils out…
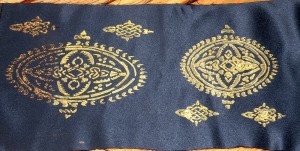
…and verify with a test print (on a scrap of fabric that I had left over from my Senate gown) verify that the stencils work.
Note that this is really just a test, I tested various colors and thicknesses of paint – the paint that was too thin ran beneath the stencil and looks ’smeared‘ on this test scrap on the smaller symbol on the right side – but now I know which paint thickness to use for the actual printing.
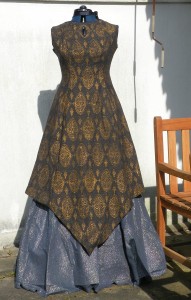
This is what the overdress looked like when I had finished stamping the symbols:
Just because the intense sparkle of the costume doesn’t photograph well, I also recorded a short video.
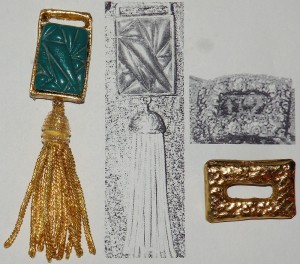
Here is a photo of the brooches I made, laid out on my printed, proportionally scaled template of Kay_Dee’s exhibit photos of the original brooches (which, you might have guessed it, I needed to get the scale right when I made them).
I know they look HUGE, but for example the entire tassel brooch is just 4 inches long – you can estimate how small they actually are.
I made them using epoxy resin (for the base of the tassel brooch and complete rectangle brooch), leaf gold (to make both appear to be ‚real gold‘) and polymer clay (for the green ‚carved‘ „stone“) as well as one small golden bullion tassel (for the tassel brooch, obviously!) and a bit of wire (to attach the tassel to the brooch).
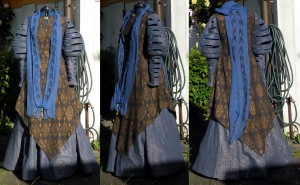
Here’s another picture of the mostly finished costume.
A HUGE problem is that the silk chiffon veil is SO DAMN LIGHTWEIGHT (which you can see particularly well on the backside).
In a studio when shooting that movie… no problem. Outside in the garden.. big problem; the veil is being blown by even almost nonexistent wind ALL OVER (particularly the backside, where – opposed to the front with the tassel brooch – no weight is attached).
I’m thinking about sewing in some lead weight trim, as usually used for curtains, because otherwise I see my veil being blown everywhere except where I want it to be (nicely draped over my back, that is).
Me wearing the finished costume at Star Wars Celebration Europe:
Bail Organa
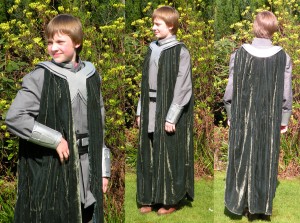
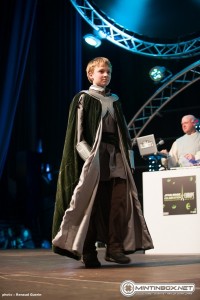
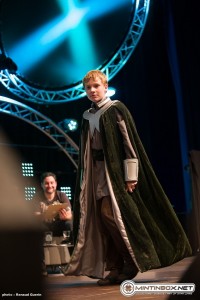
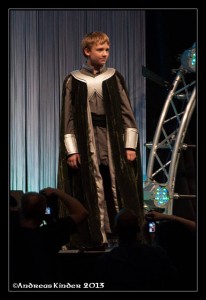
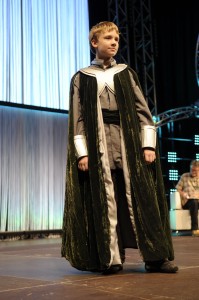
For my son I made a Bail Organa costume; the „Senate Chamber“ outfit (dubbed the „X-Men“ costume for the shape of the metal harness), to be precise.
Or rather – he made most of it and I helped, since I have the opinion that if you want to wear something in a costume contest (like he did), he has to actually make it and not just watch someone making it, lol.
Here’s a picture:
The costume is not quite finished in that picture – he still needs new boots and the cloak needs lining (and maybe another green dye bath).
My son wearing Bail at the Star Wars Celebration Europe Costume Masquerade:
~Please also have a look at my other Star Wars costume reproductions! ~
I see its been a while since anyone has posted so hopefully this reaches you.
I am about to embark on the construction of this beautiful dress, thank you for all of your hard work you are sharing here.
I just wanted to ask if I can borrow/print the pattern for the stencil for use on my costume as well. (I like to ask and not just assume).
THANK YOU!!!! I feel in love with this dress after seeing detail of it in magazines and dressing a galaxy. I’ve decided to make this outfit for Dragoncon 2013 but aspects kept confusing the heck out of me. Your site has helped A LOT, but I have one-o.k. a few more questions:
1. Are there side slits with laced clothing ah la middle ages, or just enlarged arm holes to accommodate the sleeves?
2. YOu say the gown is wool, I’ve always thought it was a brocade, or is it a mix-brocage lined with wool?
3. How many crinolines do you think are needed to give shaping?
4. Flats? Heels? Boots?
Thank you for this page!
Hi there!
1. I don’t quite understand what you mean with „side slits“. There are none. The large sleeves are sewn to the overdress; the underskirt is just that – an underskirt, not a full dress.
2. Let me clarify terminology: „Brocade“, just like „velvet“, „satin“, „twill“ and „chiffon“ are weaves. „Wool“, „silk“, „linen“, „polyester“ and „cotton“, for example, are fibers, which are spun into threads, and those threads are then used to „weave“ the fabric (which is what the end product is called).
The sleeves and underskirt are most certainly made from a plain wool-lurex weave. Otherwise there wouldn’t be any „fuzz“ on the fabric, which there clearly is in the exhibit photos.
That kind of „hairy fuzz“ is not on the overdress, which indeed is either a brocade-, damask- or jacquard weave; though I of course can’t precisely tell which fiber that brocade has been woven with – I suspect (at least a blend using) silk or rayon since the threads, in places, are quite shiny. Also, of course, there’s most certainly some lurex in that weave; otherwise it wouldn’t sparkle the way it does.
3. No crinolines are used to give the shaping. A „crinoline“ is a hoopskirt with steel hoops to shape it. However, the way the original skirt drapes, it’s way more likely that a floor-length petticoat is worn under the original gown.
4. No idea; the shoes aren’t visible in the movie. Personally I must wear heels since I’m unable to walk without wearing at least 2-3 inch heels (because some of the tendons in my legs are too short).
Hope that helps 🙂
Wow, I was constructing a full under-gown (medieval layering) and all that. Are there any articles on the dress in detail, I’ve scoured the web for pictures but there isn’t really that much on the construction of this gown. Also, I live in Florida so I would like your opinion on the most breathable fabric choice for this outfit. And yes you’ve helped me alot!
Thank you 🙂