Note:
In case you’re looking for a good fabric to make this dress, have a look at this fabric on Spoonflower.
It’s not perfect – after all, it’s all printed and therefore doesn’t have the ‚velvet stripes‘ – but at least it has the correct width of the stripes (approximately 1/2 inch) and is black and white with the tiny golden stripes bordering the black ones. Order a test swatch! I do recommend to get this fabric in ‚Organic Cotton Sateen‘.
Some years ago I already made a reproduction of this gown for someone else – in black and white striped cotton twill. However, something was ‚wrong‘ on this reproduction. I couldn’t put my finger on it, but something was wrong. Here are two pictures:
Oh, the overall shape was right. But something seemed wrong with the fabric (besides it having too narrow stripes). But then, all I had back then was the movie and screen captures to make this reproduction, and for that, I think it was a fairly good copy.
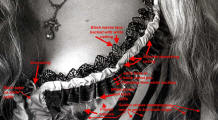
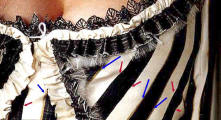
I couldn’t figure out what was wrong until Costumersguide had some high res images available. And it struck me like lightning when I saw them. I’ll show you two closeups (which I will further explain later):
The fabric, long and by most still being considered as ’striped‘, was not just ’striped‘. Actually, it’s cut velvet! The black stripes are piled velvet, the white stripes are cut and show just the backing.
Anyway, in the black and white picture from Costumersguide, this is only obvious on the ruffle along the neckline (where you can see white ‚lines‘ in the black stripes), resulting from the pile being photographed straight and therefore showing the backing beneath the pile. I call this the ‚pile‘ effect, and will refer to it once more on the ‚Velvet – Dye and paint‘ page which will come next in the navigation.
The colored image also shows this effect on the front center ’stomacher‘, plus you can see some of the pile’s edge on the side stripes.
Plus, there’s something else:
Every second black stripe is bordered by thin golden lines; I’ve outlined that in the colored closeup with blue and red arrows – the blue arrows point at the golden lines, the red ones indicate that the golden lines are missing next to every second black stripe. I think both of the above shown close-ups show this pretty well.
If you’re a costumer, I guess you can figure how the odds are that ever in your life a fabric like this will cross your path. I didn’t have much hope – for over three years.
I already had difficulties finding the damned printed black and white twill, dammit! So I didn’t have too much hope to find any velvet that would suit this gown after I found out what was really wrong with my first repro.
Over the years I had two ideas how to fake the striped cut velvet:
– sewing velvet trims on white fabric (which, I calculated, would take far over 500 yards of velvet trim to be sewn down);
– burning out my own striped silk velvet (which would take approximately 2 kilograms of burn out fluids);
but both of them never really appealed to me for the sake of economy…
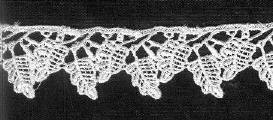
However, in the meantime, I found this:
rayon lace, which was the closest I could find to the leaves lace that borders the neckline of the gown. As it’s rayon, it dyes perfectly, so 50 yards of it went into my stash (you never know what you might need it for, right…?).
That, of course, was right *after* I made the aforementioned reproduction in twill; which is why I didn’t use it there. It’s just a rule of thumb: The more you search for something, the less likely it is that you will find it in time when you need it, and the higher likely it is that you will find it right after you used a substitute…
…which, of course, was also the case with the velvet.
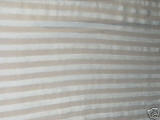
Eventually, or, to be more exact, by the end of 2006, I found it almost unbelievable when this velvet crossed my path on Ebay:
…striped burnout silk velvet. YES! And the amazing amount of 12 yards in one piece, too! At an affordable price!
I didn’t dare to cheer about my finding until I had indeed won the auction. In fact, I didn’t dare to cheer until the fabric was at my home! But when it was, I did a *very* happy dance, that much I can tell you!
That was about the time when I started planning my gown properly.
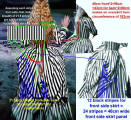
The first thing I did was to find out about some proportional matters. I measure 175cm from head to toes with heels (5’8“ for the American folks), so I resized an image of the original gown and measured the ruffles etc. in proportional relation to that measurement:
Then I took some good looks at the pictures…. should be self-explaining from now on…
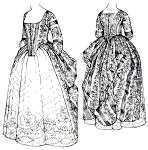
…drafted a pattern by modifying one from Janet Arnold’s ‚Patterns of Fashion‘ – this one, to be exact (of which the quilted petticoat is so beautiful that I’m intending to create it with a different garment – the green/cream one from ‚The Perfume‘, to be specific)…:
…and then I started working on my fabric, which, as weird as it might sound, at first was an absolute disaster which then turned into amazing beauty.
Follow me to the adventures of burnout silk velvet dyeing and painting!


That is extraordinary. Thank you for sharing your instructions, based on all the hard work you had to do. I didn’t think I could make it, and now I KNOW I can’t! It’s a little too advanced for me. My daughter is 29, and she has loved this dress since the movie came out. Would you consider making another? If so, how much would you charge? (I know, $$$)