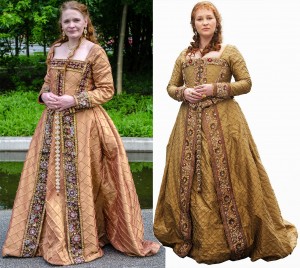
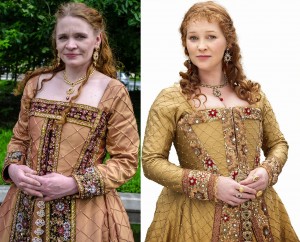
I was, like, OMG, FINALLY an Elizabethan costume that I can actually WEAR!
Because, you know… there are no „RenFaires“ in Germany; and when I create an Elizabethan costume – an era which I love to bits! – I can only wear it for some photos and then have to put it back into the closet – a destiny that, for example, my Pelican gown had which I only wore three times; and none of that was an event.
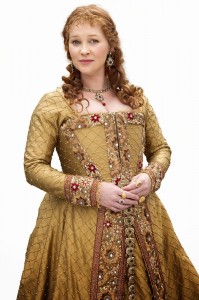
However, the Queen Elizabeth I from Doctor Who is completely different because I can actually wear it at Sci-Fi Conventions, like FedCon.
Squee! 😀
Things to change to make the costume historically accurate
Now that I explained the motivation, let me explain what I want to change about the costume on my reproduction.
Change? Yes, change; because I’d prefer a historically accurate version opposed to what we see on screen.
Let me start by…
Lack of skirt support
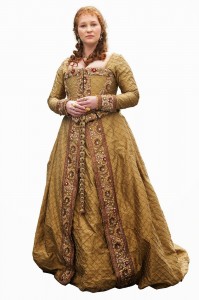
It’s very obvious that Elizabeth’s gown is TOTALLY lacking the support of a historically accurate Farthingale, or hoopskirt, as it’s called nowadays.
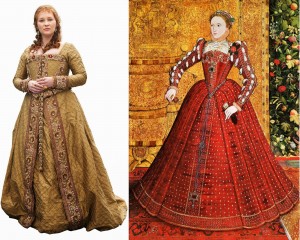
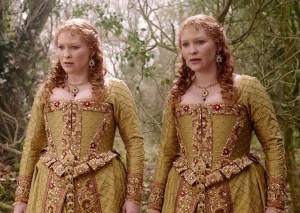
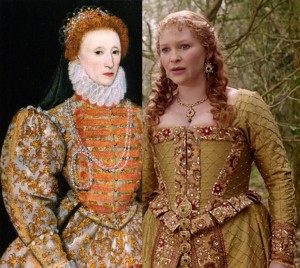
Here’s a comparison of what it looks like in the movie opposed to what it should look like historically:
You can instantly see how „floppy“ the skirt of Dr. Who’s Elizabeth is opposed to the very rigid and stiff appearance of the actual gown of Queen Elizabeth. And yes, they DID wear floppy skirts with next to no support; but that was quite a few years earlier – Tudor era. So a proper farthingale is on the list as well – actually, I can use the farthingale which I made for the Pelican gown with this gown.
Speaking of the skirt –
Sewn-in Forepart
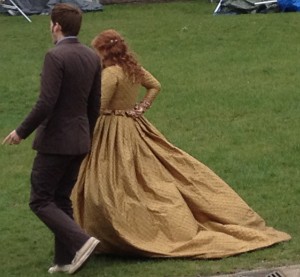
The forepart – that’s the triangle-shaped piece of fabric between the two trims on the overskirt – is VERY obviously sewn in; probably to save the fabric that would be required for a separate underskirt.
You can see that rather well in this picture, where Joanna page is lifting the skirt up – the front triangle moves upwards with what is supposed to be a *separate*, front split overskirt:
If you would like to know what it SHOULD be constructed like if it WERE historically accurate, please have a look at my „Forepart„, „Petticoat“ and „Overskirt“ pages from my Queen Elizabeth I. Pelican dress diary.
Then we have…
The Y-belt that’s actually an I-belt
If you look at the picture I posted under „Lack of skirt support“, you will notice that something is dangling from the waist down on both the portrait and the movie costume.
However, in the costume photo, her arms are hiding the waist, which is clearly visible in the painting; showing an Y-shaped belt, or „Girdle“, as it’s properly called.
Let’s take the arms away and reveal….:
As you can see, the dangling thingie on the movie costume isn’t an Y-shaped belt or girdle. It’s just a dangling thingie which doesn’t go around the waist. An I-belt, not an Y-belt, so to speak.
I’ve asked myself for quite some time what that may be, and eventually it hit me.
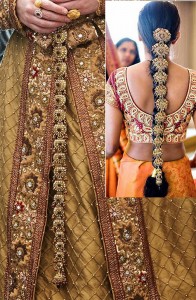
It’s an Indian hair decoration called a Choti. I suspect the BBC costume department took two Chotis, disassembled them, then put the elements back together according to their size, which, as you can clearly see in the picture, is larger at the top and smaller at the bottom.
Speaking of Indian – at THAT point I asked myself if Doctor Who’s Queen Elizabeth is supposed to originate from India; but more on that matter later.
So… to be historically accurate, the I-belt has to become an Y-belt. Not difficult at all; using two Chotis and a Bollywood rhinestone waist belt, lol 😉
Too large skirt tabs
The skirt tabs are the fabric thingies that extend from the waist of the bodice. Historically, they WERE worn – even if a bit later, when the sleeves became larger as well! – but they were smaller.
Quite a bit smaller actually. As in, like this:
Men wore larger tabs, yes; but not women.
So… I have to create smaller tabs – not much smaller but a bit smaller.
Lack of lacing and trim on the backside
The front of the movie costume, obviously, closes with hooks and eyes right at the center front. That is historically accurate.
However the backside…
Nothing. Nada. Njente. Nix.
No lacing and no trimming, like the front of the bodice sports.
Now, most Elizabethan portraits only show the wearer from the FRONT. Actually I cannot remember a single historical portrait showing Queen Elizabeth’s backside.
BUT we know from extant garments that even WHEN there was a front hook and eye closure, the backside was laced – either at the center back or twice, at the back sides, running towards the armhole – plus the trims / decorations should also be on the backside.
The Eleonora di Toledo burial gown, for example, exhibits the side back lacings as well as the trims on the backside.
So that is something I have to change as well – add historically accurate lacings to the backside. That also has a practical reason – since the bodice is so tight and my weight loves to fluctuate, the side back lacings give me a bit of room, literally, to play with.
All those changes to make the gown more historically accurate will not take away from its overall appearance. In fact, it will remain very recognizable; just that it will be more accurate for the period which it’s supposed to be worn in.
Now that we talked about the bad stuff, let’s talk about the good stuff.
Things that are historically accurate and materials
Proper sleeves
As you can see, opposed to a modern underarm seam, the costume sports a seam at the front of the sleeve, and probably as well on the back of the sleeve opposed to the modern underam seam. That is completely historically accurate – sleeves were constructed from two pieces, opposed to one piece, at that time.
Overall shape
Absolutely historically accurate with the trimming of bodice and skirt; the non-supported skirt aside. Compare these two pictures:
As you can see (lacking of split skirt on the Eleonora gown aside), the overall shape of Elizabeth’s gown is, in fact, with the trimming rather similar to Eleonora di Toledo’s burial gown; just that Elizabeth’s is – and I already mentioned that – completely lacking the trims and lacing on the backside (but instead sports those too large waist tabs, which I also already mentioned). But the overall shape is very similar and historically accurate.
The train as well as the small pleating along the waist, as this picture shows, is also on Elizabeth’s gown; appropriate for Elizabethan court wear.
The underwear
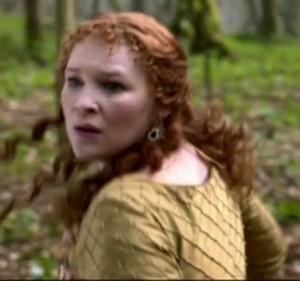
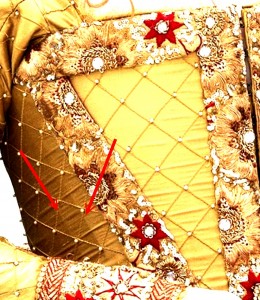
Again, lack of proper skirt support aside, but Joanna Page obviously wears stays underneath the gown – you can see the boning of the stays pressing through the material in this picture:
If you compare that pressing through boning to the stays I made for my Pelican gown:
you will instantly see what I was talking about when I mentioned the boning.
The trims
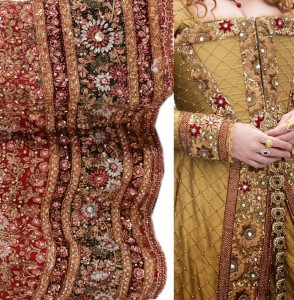
I suspect the trims to be the border of either an Indian Saree or a Lehenga, which is a heavily embroidered / beaded type of Indian skirt with a bottom circumference of approximately 4.4 yards / 4 meters; so the trim that is on one Lehenga would be enough to use as trim for the entire gown.
Here’s a picture I photoshopped of the costume with the border of a Lehenga:
As you can see, it’s similar, even if it’s not exactly the same.
What makes the trim on the costume so unusual is the fact that it sports flowers which even look like stars in some places. The fact that the sequins which SURROUND those flower-stars are brighter gold than those which are sewn to the CENTERS of said flower-stars makes me believe that the surrounding sequins may be a later addition; perhaps by BBC’s costume department.
Remember what I said when talking about the dangling girdle? So here’s another connection to India: the Lehenga- or Saree trim 🙂
But wait, it gets even better.
The jewelry
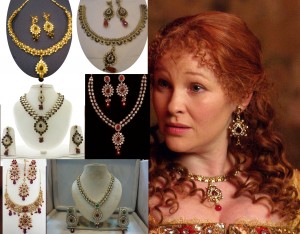
I suspect the jewelry – earrings and necklace – Elizabeth wears also to be of Indian origin.
Here is a selection of „Bollywood-style“ jewelry sets I found when googling that matter compared to what Elizabeth wears.
That’s the third connection which Elizabeth’s costume has to India. But it`s not the last.
The fabric
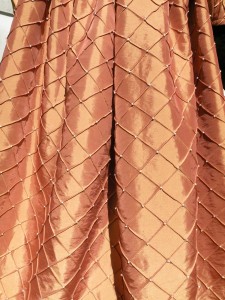
The fabric used for the costume is a pintucked, beaded dupioni silk. It’s rather widely available; but the color is a bit unusual.
It’s not as light gold as Syfabric’s „dark gold“ or Puresilk’s „gold“ pintucked, beaded dupioni silk. And no, no matter how much darker Syfabric’s dupioni looks like in their product image, it’s basically the same color as Puresilk’s pintucked dupioni silk.
The exhibit pictures which just surfaced yesterday (as I type this) show that the fabric has a very distinct orange undertone as well.
My dear friend Laura from Rockingthefrock will go looking for that tone when she goes fabric shopping – unfortunately, and even if I tried it for several days and many, many hours (which is rather unusual for me – I usually find stuff VERY quickly!), I couldn’t locate any online seller that has a color close to that.
Pintucked silk yes – pintucked and beaded silk, no.
And if there’s even just the tiniest chance that I don’t have to do the beading by hand, I will instantly take it, lol.
Making of the costume
I have received the beaded and embroidered Lehenga for the trims as well as the waist belt for the girdle and the jewelry set that is shown in the picture above at center/right position.
For the fabric and chotis, I will have to wait a bit longer.
However, here’s the jewelry I bought; side by side with the original jewelry:
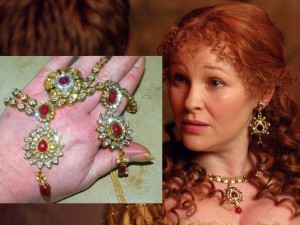
What you are seeing here is one of the two earrings (on my thumb), the necklace (over the back of my hand) and an „almost Tudor rose“ ring on my finger („almost“ because it only has four opposed to five petals, but I found it insanely pretty!).
In case you’re wondering; yes, that jewelry is (as so many items on Liz!) from India – I bought it at Mirraw; which I highly recommend because the jewelry is of good quality and the shipping is fast (I do consider a bit more than one week from India „fast“, but your mileage may vary on that matter, of course). Note however that Mirraw is a jewelry broker, selling the products of many designers; so I can only judge the quality of the items I bought.
The earrings / necklace set is here and the ring here – the belt which I also bought is not pictured since I still have to combine it with the two choti, which I ordered elsewhere) is here.
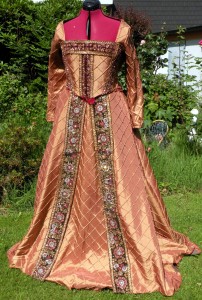
Here’s an in progress photo of my costume.
As you can see, the bodice is mostly finished (except for the skirt tabs and sleeve decorations – I ran out of fabric glue, which I need to attach the heavily beaded lehenga borders; plus, the side back lacing is also still missing).
The skirt, too, is mostly finished, except for a waistband; it’s just pinned to the mannequin. So basically everything is just pinned in this picture.
For the gown, I used Margo Anderson’s Elizabethan Lady’s wardrobe pattern. I basically just shortened the front of the bodice a bit and also frankenpatterned the skirt from the front of the underskirt with the back of the skirt, on which I shortened the court train by half of its original length.
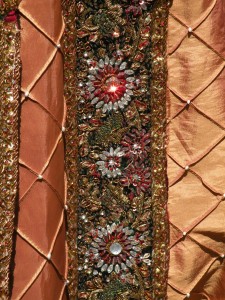
Look! Shiny bling by the lehenga borders! 🙂
Oh and I had to change something else.
As you may have read above, I originally planned to use real beaded silk; but for a variety of reasons that didn’t quite turn out.
First, the color I needed – gold with an orange tinge – wasn’t available; and I wouldn’t have been able to do an irridescent dye on a fabric that has just one fiber content.
So I resorted to a poly-nylon blend fabric. On that, I could dye the nylon blend to a terracotta color, while the poly part remained golden; hence the irridescent color on what you see on my gown.
Problem was that I couldn’t get that poly-nylon blend fabric beaded. So I resorted to using a pearl pen. That process went REALLY quick – my son did most of the decoration of the gown (or rather: on the pattern pieces, before I sewed the gown up) with that pearl pen (of which I blended two colors – ice white and cream); and he did so in under four hours.
In case anyone would love to object to „child labor“, first, my son is fourteen; second, my son wants costumes as well (which I make) and third, why shouldn’t he help to make the costumes with the more simple things that he does well and likes to do – ask yourself those questions before you go mad about me entrusting my teenage son to decorate the precious fabric of my gown with a pearl pen.
The effect looks quite convincing, doesn’t it?
Here are photos of the finished gown at Germany’s FedCon 2014. And yes, I even had two Doctors propose to me simultaneously.
Funny side story:
My son was Marty McFly from „Back to the future“ at the very same event.
As soon as the Whovians found out that he was my son, one of them cried out: „Marty McFly is the son of Queen Elizabeth! Doctor, WHAT HAVE YOU DONE?“ 😀
More photos from that event can be found on the „FedCon“ event page.
Me, my Doctor and an Adipose baby!
No less than two doctors proposing to me 😉
Doctor Who group photo:




Excellent information, and I admire your work and your research so much! I was wondering what exactly is a pearl pen? Can you link me a product? I am having a hard time finding it.
Thanks!
Hello Naergi
I hope I won’t disturb you, as you haven’t post anything since monthes, maybe you’re busy with other works…
But everything you have done before is so amazing ! Your cosplays and other creations are incredible !
I’m used to sew cosplays too (a lot less amazing !) for my daughters and myself, and as I’m a big fan of Doctor who, I’ve decided to make the cosplay of Elizabeth the first. I’ve already done Idris and Jabe, Elizabeth is more difficult, BUT with all your explainations, it will be almost „a piece of cake“ for me !
I only have a small question : how many pearl pen have you used, for the dress ? I am more or less the same size as you, at view…
I hope my daughters also will work on the pearls, they want a cosplays too. The joke about The doctor and Marty McFly make me chuckle alone all the afternoon, when I’ve read it…
Best wishes
Chantal
PS : my english sounds certainly a bit exotic : sorry about that, as you can see with my first name, I’m french !
Hallo Neargi!
ich wollte mich hier auf diesem Weg kurz für deinen tollen Eintrag zu deinem Elizabeth Kleid und die rieße Hilfe die er für mich war bedanken. Die Idee mit dem Schmuck und all den Indien- Artikeln.. ich hätts vermutlich so nie gefunden :3
Troz der ganzen Hilfe die mir deine Seite war habe ich über 2 Monate sehr intensiv Materialsuche betrieben.. unglaublich wenn man sich jetzt so das Kleid anschaut ;)…
Ich habe das ganze Kleid Cosplay-technisch für die MCM letzes Wochende umgesetzt und hatte sogar vorher noch die Gelegeheit das Kleid im Original in der der Exhibiton zu bestaunen (… diese Borte….).
Hier jetzt ein Bild von meiner Umsetzung falls es dich Interessiert:http://www.fotos-hochladen.net/uploads/10410543637577n081i6r935.jpg
Also großes Danke nochmal <3
LG, Seli
Das ist ja WUNDERBAR geworden! Und ich MUSS natürlich fragen, woher Du die Borte hast 😉
Ich werde meines wohl am kommenden Samstag auf der FedCon tragen, sofern sich mein Gesicht, was ich mir vorgestern verbrannt habe, bis dahin erholt hat…
Vielen Dank :D!
die Borte hatte ich von dieser Seite: http://www.vintageandyou.com/vintage-borders.html
war leider auch das letzte Stück :/… die rote Blumen und die etwas größeren Steinchen hab ich allerdings nachträgich aufgenäht.
Oh dan bin ich schon sehr gespannt! hab hier immer mal wieder reingeschaut in der Hoffnung auf neue Bilder *gg*
Oh, die Seite kannte ich noch nicht – danke! *bookmark*
Naja, jetzt wäre es sowieso zu spät, die Borten noch zu ändern – ich find meine Lehenga-Borte aber auch ganz hübsch.
Ja, Bilder. Genau. Äh – nach der FedCon, lol….
Danke für die Bilder!
Ganz ganz wunderschön ist es gewordern *o*!
Dankeschön! In der Sonne hat es supertoll gefunkelt.
OMG Thank you for posting all of this great info! I have been wanting to also do the QE1 cosplay since I saw the 50th special but have been struggling finding the trim and accessories. I like how you’re altering the costume for period accuracy as well. Ii’m going to opt for making it as close screen acurate as I can instead. And thanks to your suggestions I ordered a bunch of stuff on Ebay last night…
Trim
Choti for i-belt
And I ordered two jewelry sets because I wasn’t sure which would match better
For the dress fabric, I think I’ll just do normal gold 1″ pintuck taffeta as finding it beaded or doing the beading myself is unlikely.
I’ll be wearing mine to Phoenix Comicon in June 2014 so I should have plenty of time to finish it. I’ll post progress pics and con pics with my Doctor later 🙂
Again, thank you so much for all this amazing info!
Hi fellow QEI costumer 😉
I guess what you were trying to say is that you wanted to make the *costume* to be able to *cosplay* Elizabeth? Because, you know, what you wear (=create) is the costume, and when you wear it, you can pose and behave like Elizabeth – that’s cosplaying… 😉
I hope you ordered two of the Choti belts. One isn’t nearly long enough (I think they’re about 15-17 inches long?); you then need to disassemble the two and put them back together in order of the size of the elements. Nice choice, though – I had almost ordered two of them but then I found some that were a better match, color-wise, to my jewelry.
Speaking of jewelry, the second set you posted looks great because it actually is drop-shaped like the original jewelry; but I’m not sure about the red color of the stones – they may be a bit too light. You can exchange them with Swarovski rhinestones though, which are available in pretty much every color, size and shape.
The beaded pintuck fabric with 1“ diamonds IS available without problems – google „pintuck beaded fabric“ or „dupioni pintuck beads“ (or any combination) and you’ll find plenty.
Looking forward to seeing your costume – please do keep me posted! 😀
And by the way, my son will be my Doctor – wearing the Elizabethan suit from the portrait 😉
I finished my dress and the pictures are here on my Facebook…
https://www.facebook.com/media/set/?set=a.10203079848769875.1073741838.1015644286&type=1&l=96ca59ad0e
Once I get it dry-cleaned (the train is filthy now), I think I may do what you did by using a ‚pearl pen‘ – that’s such a great & fast way to achieve the look!
Thank you for all the info & research you did as I would have never found the choti without you!
Thank you so much for sharing – your creation is very pretty! 🙂