– Edited to add:
During to a flood that hit my house, the fabrics and partially completed costume parts were destroyed.
So until I decide to actually redo everything with new fabrics, the pages for this gown only serve as a documentation and memory of what I made; not as a dress diary.
The first thing when getting my fabric was some planning concerning how I could get Margo’s pattern to work with those sleeves. Don’t get me wrong; Margo’s patterns are probably one of the best things in the Elizabethan costuming world – but for *some* projects, like this one, they have to be changed.
The rough shape of the Spanish sleeve in Margo’s pattern looks like this:

One half of the ‚Spanish sleeve‘ pattern piece from Margo’s patterns.
Which is of course correct for the ‚usual‘ Spanish sleeve, though Alcega’s book shows this curved sleeve surprisingly with an almost straight, slightly inward pointing curve towards the shoulder instead of the modern, outwards pointing and slightly wavering curve. But I think I’ll get along better with this rather modern layout, as the inwards pointing curve is not what I could use for the portrait’s sleeve, as you will see.
Looking at the portrait…
…I find that the outer curve on the *slashes* is not a curve at all. It doesn’t even have an angle – the slashed strips seem to be quite straight while they’re curving along the backside of the arm. There is also no seam visible on those slashes‘ backsides – which indicates that the sleeve is made from one piece of fabric.
Now, as I have already proved in the planning…
…the slashes run on the bias, while the front opening of the sleeves doesn’t.
So basically, the pattern would have to look about like this…:
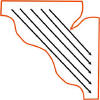
Probably the most extravagant pattern layout of a Spanish sleeve I have ever seen, but alas – those sleeves *are* extravagant, aren’t they?
This would make sure that each front opening side of the sleeve would run on the straight grain, and all slashes – marked in black – would run on the bias. It would also ensure that I can still tie the lower curve of the slashed sleeve with points and aglets, as it was done in the painting.
I am, however, not so sure if the lowest slash wouldn’t be too long this way… they *are* quite long in the portrait, especially the lower ones – just as in this pattern layout… I think I will just have to try and see what it looks like when it’s done.
The pattern layout will have to be revised, though – looking at the portrait, I have the impression that the front opening of the Spanish sleeve is not located on the center of the shoulder, but slightly moved towards the front. This would result in a pattern looking like this…:
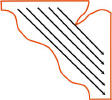
I’ve moved the front opening a little more to the front. The middle of the shoulder is now on the right side, moved a little inwards.
Well, yes, I think that this could work. Though, of course, the front edge will have to be slightly curved, and the ‚wrist‘ parts will have to get some kind of tabbed look.
The lower edge of the sleeve – the already mentioned ‚wrist‘ part – will also have to be as broad on the front- as well as on the backside.
Oh, and the place where the outer curve (which is to be tied by points) meets the last slash will have to be a little pointy.
This particular pattern layout could be somewhat period – it reduces scraps! See how two sleeves fit on a piece of fabric:

Good, scraps-saving layout of left and right sleeve pattern piece
Assuming that the side length of the fabric rectangle needed is about 70×100 cm / 28×40 inches, and furthermore assuming that the historical fabric had a breadth of about 30 inches, this pattern layout could indeed have worked.
This also means that from my 60 inches wide fabric, I can cut *four* Spanish sleeves (which I need for the outside fabric and the lining; and both twice for each left and right side!) from a little more than a yard of fabric.
Hmm, I *should* have come up with that layout *before* I ordered the fabric – I will approximately have more than two yards left when I have finished the ‚orange‘ parts of that outfit…
Not that I would mind. I *love* large scraps! Hmmm, perhaps I could make the outer shell of the ‚white‘ doublet from that, and order more of that fabric at a later point of time for the petticoat…?
Damn, I’m so proud of what my brain comes up with at 3:44 am in the night… And there were people out there who once said I couldn’t come up with own patterns… Let’s just hope that this pattern layout will also work in reality 😉
I will just have to take into consideration that the slashes should become shorter from top to bottom. In the pattern layout, they’ll still form some kind of pyramid; but the bottom slashes end in a greater distance to the front opening than the top slashes in the portrait.
By now I have tested the layout – and have studied the painting again. I came to the following conclusions:
- The slashes are indeed stabilized by some kind of strip (or rather: a not slashed area) at the back / slightly moved to the inside.
This can actually be seen in the portrait on the left sleeve:
The slashes seem to have some kind of ‚end‘ right under the arm. There is an area under the arm which is clearly not slashed.
This confirms my theory about the ‚front slash moved from the shoulder to the front‘ – the non-slashed area is exactly under the armpit (if you’re reading much fan fiction, no matter of which fandom, then you know why I’m grinning all the time while typing this!), which is the best hidden place. The front ‚bottom / inner‘ part of the sleeve is the narrowest pattern piece; the top/outer part of the sleeve is broadest, so this part will have the longer slashes, which practically result in the *very* long slashes which seem to run around the entire sleeves in the portrait. - The slight curving of the front opening is, at least on the inner side, obviously resulting from slight curves which are pieced to the otherwise straight front opening. There is a seam visible on the right sleeve in the portrait:
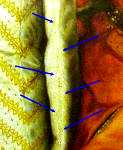
So… that’s the secret (which still saves scraps!).
So the final version of the pattern looks like this (curved front opening not included):
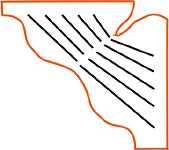
Pattern with the slashes „ending“ under the armpit. The slashes on the ‚outer‘ sleeve are longer than the ‚inner‘ slashes, plus the strips between the slashes become more narrow to the backside – just the way it’s done in the portrait.
Well – what can I say. Here are some picture s of the fabric cut in that pattern layout, still without the pieced inner curve and still not slashed, though the slashes are marked on the fabric ( best visible in the third picture) . The sleeves are pinned together with the ‚lining‘ pattern pieces; but they are not yet sewn together.
The first picture shows the front opening (I’m holding it open with my hand), the second shows the sleeves from the backside and the last picture shows the sleeve from the side.
And then I was in some kind of dilemma.
As much as I wanted to finish the sleeves – if I would *first* embroider them and *then* find that this slashing (or the pattern layout even!) wouldn’t work, then I would have to cut and embroider the sleeves again – because if the sleeves are slashed, there’s no way to undo the slashing if I should find that I was wrong with the pattern.
However, if I would first slash the sleeves, the embroidery would be more difficult as only the outer layer should be embroidered – the lining would have to be untouched by the embroidery, but that’s difficult as it would have to be sewn to the slashes of the outer fabric layer.
After thinking about a solution longer than usually, I decided to first cut the slashes. The embroidery *would* be more difficult then – but at least, it would not be in vain.
By the way_
I didn’t think for a single second about making a muslin; simply because I strongly dislike muslins. They take up much work for nothing (except if they can afterwards still serve as a lining).
After a *very* brief testing on the first cut slash, I knew that the ‚turned over hems‘ method, as described in the studying, wouldn’t work – while it looked perfectly along the length of the slashes, the turned over ends of the slashes wouldn’t curve the way I needed them to. So I would have to bind the slashes with bias strips, which I would have to cut from the fabric so that they would have the same color as the lining (guess how thankful I was at that moment when I remembered that I had two yards more fabric than I thought I would need!).
Now – five slashes per sleeve – that’s ten slash lengths on one sleeves to be bound, and twenty on both. Assuming that each has a length of one yard, that makes twenty slashes times two (because they have to be bound on the upper- and lower side) = 40 yards of bias strips to be made – and to be sewn on, *sigh*…
I would show you pictures of the slashed, but not yet bias-bound sleeve – but as the edges of the slashes are not hemmed, and therefore the slashed strips are not stabilized, they’re hanging down rather tired instead of standing… well… I guess there’s no way explaining this, I’ll have to show you pictures…
In case you should wonder: Yes, each slashed strip has a sewn line at its edge. I did that to secure the fabric and lining layer to each other along the strips.
It’s a strange moment – after embroidering half of the doublet, I’m a bit disappointed how the sleeves currently look.
I *know* that they will look right as soon as I have hemmed the slashes with bias strips, added the curve to the front opening and especially as soon as there’s a human shoulder and arm in the sleeve, to hold out the shoulder, open the front slash and to give a little body to the sleeve… but currently I just feel a bit… disappointed.
I had so hoped that the ‚turned over hems‘ method would work for the slashes 🙁
I’m not disappointed about the additional work… just about the ‚tired‘ look of the sleeves. The slashed strips are hanging down as if they had not slept for ages… 🙁
Plus, to be honest – I am also disappointed by the look of the sleeves from side and back view. They just look… well… destroyed. I know that this is the way they are supposed to look – and I will certainly get used to it – but… they… look… destroyed. Cut up. Slashed.
It would certainly be milder on the eye if there was an undersleeve, or better a human arm in the slashed sleeve upon which I could look when staring at the slashes, instead of practically looking through them and seeing even more slashes on the inside… but… I’m disappointed.
(This may have to do with the fact that I’m currently a bit depressed for other reasons, but to be honest – the current state of the sleeves doesn’t really help me in getting over that depression)
I think that this project, at least its sleeves, have come to a halt for the moment. I will first have to get rid off my depression, before I continue on those sleeves.
Just good that I found that embroidering (the doublet parts, for example) is a very nice, boring and distracting thing to do when I’m depressed…

